Installing T9 CircuitPython Firmware
- Dowload the latest version of CircuitPython for the Adafruit QT Py RP2040. As of July 2021, version 6.3.0 works great on all boards.
- On your development board, hold the button labeled 'boot', and plug it into your computer.
- After a few seconds, you'll see a new storage drive mounted to your computer. Release the button.
Drag the UF2 file downloaded in step 1 onto that drive. This will install CircuitPython.
- When the transfer is complete, the dev board will reboot and the storage drive will remount.
Confirm that the drive is now named 'CIRCUITPY'. This indicates a successful CircuitPython installation.
We still have to install the T9 code!
- Find the latest T9 firmware release on the GitHub releases page.Each release should have a list of .zip files associated with it. Find the one that matches your dev board.
This board's zip file should be called: qtpy2040.zip. Download and unzip it.
- Copy all of the files from the extracted qtpy2040 folder onto your dev board,
which should still be mounted on your computer as 'CIRCUITPY'. Overwrite any conflicting files.
This may take a minute.
- Download the CircuitPython library bundle that matches the CircuitPython version that you installed.
You can find all versions of the bundle here.
- From the downloaded qtpy2040 folder, open the 'README' file.
It will contain a list of CircuitPython libraries that need to be installed as a final step.
Find each of the listed libraries in the CircuitPython bundle that you downloaded in the previous step,
and copy them into a folder called 'lib' on your 'CIRCUITPY' drive.
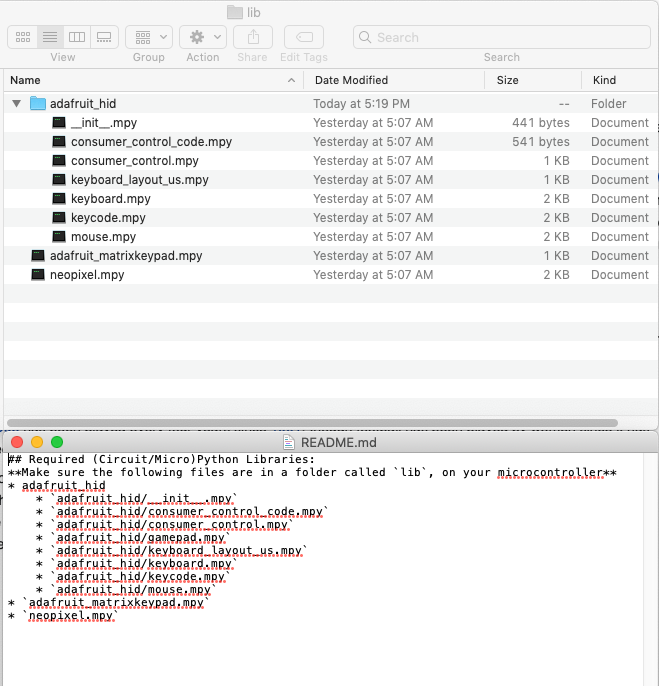
Some library files - such as the 'adafruit_hid' library - need to be grouped into a subfolder within 'lib'.
The 'README' file should indicate when this is the case. Here is an example of a matching 'README'
and matching directory structure. NOTE THAT THE LIBRARIES IN THIS IMAGE MAY NOT BE UP TO DATE!

- With CircuitPython, the T9 firmware, and the libraries installed, the board should reboot
and the light should turn blue after ~5 seconds. You're good to go! Check out the full usage instructions here!
